Here's what you'll need:
- Tin cans
- 1 Nail
- Hammer
- A white ceramic/glass/clay tray or an old saucer or plate is fine
- Herbs for planting
- Soil
- Clear nail polish/lacquer
- Spray Paint

- Remove the labels from the cans. This way you have uniformed, neutral coloured cans. If you wish you can spray paint your cans. I would opt for a mettalic colour or white.
- Create drainage holes or you'll rot the roots of your plants. Using the nail and hammer, punch 4-5 evenly spaced holes at the bottom of the cans.
- Using the nail lacquer brush paint lacquer all over the bottom of the can and on the side/circumference of the can up to about 1/4 inch (to prevent rusting).

- Add a layer of gravel or small stones/pebbles to the can.
- Add soil

- Make a small hole in the soil and place the roots and part of the stem of the selected plant in the hole and cover area with additional soil.
- Using your fingers gently press down the soil around the stem of the plant to secure the plant from falling over. Be careful not to compact the soil too much.
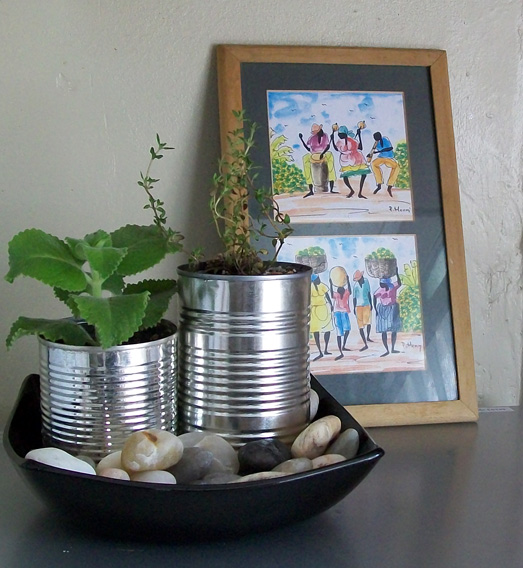
Here I used a black decorative dish I usually place fruits in for display. A white rectangular ceramic tray would look really nice in this project especially if the cans are lined up along the longest part of the tray.


- Fill your chosen base with river rocks or pebbles or place tin can with plant in base then fill with river rocks or pebbles. You may place the tin cans on top of the stones and allow water to drain to the base to be evaporated during the day or opt to not use the river stones at all.
- Place planter in an area on your counter that receives sunlight during the day. Do not put the planter ontop of your microwave. If using seedlings like I did with most of the herbs here, allow them to flourish a bit before using them for seasoning your masterpieces.

This tin can garden is particularly useful for people living in apartments with little or no gardening space. You can also use this technique with seedlings until they are ready to be planted in a garden.
You can can get crazy with it 0_0 Here's a sample of my tiny container garden complete with 1/2 a 'Crix tin' planting on the far right.

No comments:
Post a Comment